This is part 4 of a 4 part series covering all of the big changes in 1.7.2 - In this article we'll do run through exactly how to use the new ZingGrid Supabase adapter. Here are the links for part 1 of this series, part 2 of this series, and part 3 of this series in case you missed them.
In this final part we'll be covering all of the new ways that ZingGrid 1.7.2 allows you to interact with emojis, namely by more easily allowing for Emoji Pickers to be added to input fields
And by parsing Emoji short-codes like in Discord / Slack with whatever short code system you prefer.
Initial Setup
Before we get into the new features let's set up a simple grid with editing enabled so we have something to build off of.
Enabling Editing
Editing is enabled by adding the [editor] or [editor-controls] attribute to <zing-grid>. The [editor] attribute enables cell editing, while [editor-controls] enables both cell and record (row) editing. We will use [editor-controls] to demonstrate both methods.
<!doctype html>
<html lang="en">
<head>
<meta charset="UTF-8">
<meta name="viewport" content="width=device-width, initial-scale=1.0">
<meta http-equiv="X-UA-Compatible" content="ie=edge">
<title>ZingGrid Emojis Demo</title>
<script src="https://cdn.zinggrid.com/zinggrid.min.js" defer></script>
</head>
<body>
<zing-grid
editor-controls
data='[
{ "text": "U+1F98A", "type": "codepoint", "emoji": "U+1F98A" },
{ "text": "🐈⬛", "type": "emoji", "emoji": "🐈⬛" },
{ "text": ":leopard:", "type": "shortcode", "emoji": ":leopard:" },
{ "text": "Hello there :wave:, bye! U+1F60E 👍", "type": "text with different emoji formats", "emoji": "Hello there :wave:, bye! U+1F60E 👍" }
]'>
</zing-grid>
</body>
</html>Pulling up this demo in our browser we should see a grid like the one below
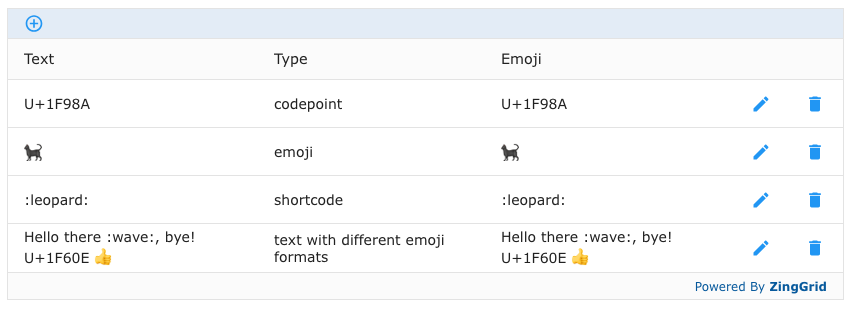
Emoji Column Type
To make use of the new emoji column type we'll need to define specifically what our columns are instead of letting ZingGrid guess. We can do this by setting the [type] attribute to “emoji” in a <zg-column> element. This does mean that we'll need to explicitly define the other columns as well.
<!doctype html>
<html lang="en">
<head>
<meta charset="UTF-8">
<meta name="viewport" content="width=device-width, initial-scale=1.0">
<meta http-equiv="X-UA-Compatible" content="ie=edge">
<title>ZingGrid Emojis Demo</title>
<script src="https://cdn.zinggrid.com/zinggrid.min.js" defer></script>
</head>
<body>
<zing-grid
editor-controls
data='[
{ "text": "U+1F98A", "type": "codepoint", "emoji": "U+1F98A" },
{ "text": "🐈⬛", "type": "emoji", "emoji": "🐈⬛" },
{ "text": ":leopard:", "type": "shortcode", "emoji": ":leopard:" },
{ "text": "Hello there :wave:, bye! U+1F60E 👍", "type": "text with different emoji formats", "emoji": "Hello there :wave:, bye! U+1F60E 👍" }
]'>
<zg-colgroup>
<zg-column index="text"></zg-column>
<zg-column index="type"></zg-column>
<zg-column index="emoji" type="emoji"></zg-column>
</zg-colgroup>
</zing-grid>
</body>
</html>
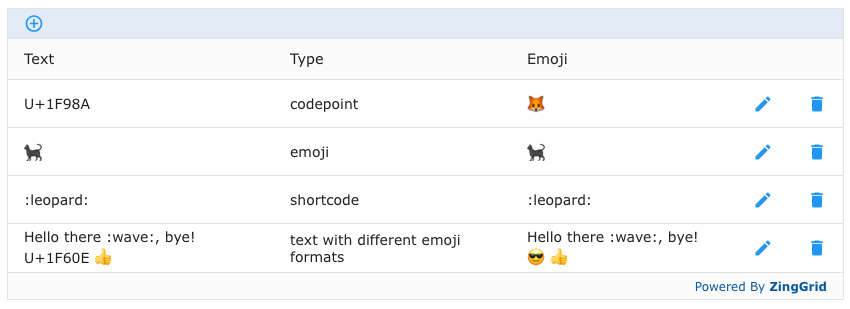
The emoji type column will convert all Unicode code points into their respect emojis (e.g. it will render U+1F98A as 🦊), however since there are many different emoji short code dictionaries we've provided a hook to add your own without bundling any one specific one with the library.
Shortcodes
To implement shortcodes, we are going to use the emoji-js library to create a simple shortcode rendering function
// Create a new emoji converter instance
let emojiConverter = new EmojiConvertor();

// Shortcode Rendering Function
function shortcodeConverter(txt) {
  return emojiConverter.replace_colons(txt);
}

// Register the function so we can reference it
ZingGrid.registerMethod(shortcodeConverter, 'shortcodeConverter');
Then in the markup there's really only two things to add:
- The
emoji-jsstylesheet & script dependencies - The
type-emoji-shortcodeattribute on the emoji<zg-column>which we'll point at our newly registered shortcode converter function
<!doctype html>
<html lang="en">
<head>
<meta charset="UTF-8">
<meta name="viewport" content="width=device-width, initial-scale=1.0">
<meta http-equiv="X-UA-Compatible" content="ie=edge">
<title>ZingGrid Emojis Demo</title>
<!-- emoji-js library -->
<link href="https://cdn.jsdelivr.net/npm/emoji-js@3.8.0/lib/emoji.min.css" rel="stylesheet">
<script src="https://cdn.jsdelivr.net/npm/emoji-js@3.8.0/lib/emoji.min.js"></script>
<!-- zing-grid library -->
<script src="https://cdn.zinggrid.com/zinggrid.min.js" defer></script>
</head>
<body>
<zing-grid
editor-controls
data='[
{ "text": "U+1F98A", "type": "codepoint", "emoji": "U+1F98A" },
{ "text": "🐈⬛", "type": "emoji", "emoji": "🐈⬛" },
{ "text": ":leopard:", "type": "shortcode", "emoji": ":leopard:" },
{ "text": "Hello there :wave:, bye! U+1F60E 👍", "type": "text with different emoji formats", "emoji": "Hello there :wave:, bye! U+1F60E 👍" }
]'>
<zg-colgroup>
<zg-column index="text"></zg-column>
<zg-column index="type"></zg-column>
<zg-column
index="emoji"
type="emoji"
type-emoji-shortcode="shortcodeConverter"
></zg-column>
</zg-colgroup>
</zing-grid>
</body>
</html>
Shortcodes Demo
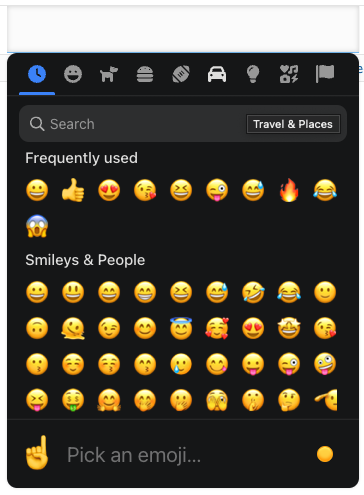
Emoji Picker
To add an emoji picker to our demo we will be utilizing the custom editor feature. We'll quickly go over the basics of that before expanding on it.
Custom Editor Basics
We can use the registerEditor() method to attach event listeners for whenever an editor is opened, closed, and initialized.
let editor = {
  init($cell, editorField) {},
  onOpen($cell, editorField, mData) {},
  onClose(editorField) {},
};

ZingGrid.registerEditor(editor, 'editorName');
The custom editor object has three properties: init, onOpen, and onClose. These are hooks for the editor to write custom functions to do the following:
init: Creates an<input>element and appends it to theeditorFieldonOpen: Sets the input value to the cell or record valueonClose: Record the cell or record value
As an example, here is what the custom editor would look like if you wanted to achieve the default editing behavior in ZingGrid:
let editor = {
  init($cell, editorField) {
    let oDOMInput = document.createElement('input');
    oDOMInput.type = 'text';
    oDOMInput.autoComplete = 'off';
    oDOMInput.ariaInvalid = false;
    editorField.appendChild(oDOMInput);
  },

  onOpen($cell, editorField, mData) {
    if (!mData) {
      mData = editorField.value || '';
    }
    oDOMInput.value = String(mData);
  },

  onClose(editorField) {
    return editorField.querySelector('input').value;
  },
};

ZingGrid.registerEditor(editor, 'editorName');
Now that the custom editor has been defined and registered, it just needs to be associated with the emoji column using the editor attribute.
<zg-column type="emoji" editor="editorName"></zg-column>Custom Emoji Picker
To implement a custom emoji picker, we'll be using Emoji Mart as the emoji picker. The method should be similar no matter which picker you go far.
init()
Starting with the init() hook function, we will still want to create the input element to allow text input so we will add to the init() function without changing anything.
init($cell, editorField) {
  let oDOMInput = document.createElement('input');
  oDOMInput.type = 'text';
  oDOMInput.autoComplete = 'off';
  oDOMInput.ariaInvalid = false;
  editorField.appendChild(oDOMInput);
},
First, we're going to define some variables that will be used across the editor hooks.
picker: emoji picker object reference. It will be created ininit()and destroyed inonClose()oDOMInput: reference to the editor<input>element. Used to append the picker ininit()and set the editor value inonOpen()
// References
let picker = null;
let oDOMInput = null;
let zgRef = document.querySelector('zing-grid');
Then we're going to set the picker's options to call on our handleChange() method whenever a change occurs in the picker. The handleChange() will sync the grid's editor to the picker.
const pickerOptions = { onEmojiSelect: handleChange }
function handleChange(data) {
  // Set editor value to picker value
  oDOMInput.value = data.shortcodes;
};
We next need to position the picker under the input field when adding it to the DOM. We'll also need to add in some custom styles based on the type of the editor, which we can grab with zgRef.editor.
// Unable to get position of `editorField` w/o setTimeout
setTimeout(() => {
  // Different styles applied depending on editor type
  const editorType = zgRef.editor;
  let styles = null;
  if (editorType === 'inline') {
    // Determine position of inline field and place under
    const editorBCR = editorField.getBoundingClientRect();
    styles = `position: fixed; z-index: 999; top:${editorBCR.top+47}px; left:${editorBCR.left}px;`;
  } else {
    // Placed under model field
    styles = `position: relative;`;
  }

  // Picker must be newly created every time else does not display all options after first edit
  picker = new EmojiMart.Picker(pickerOptions);
  // Styled to position under cell and make it placed outside and in front of grid
  picker.setAttribute('style', styles);
  // Placed in `editorField`, else navigating through picker submits editing changes
  editorField.appendChild(picker);
}, 0);
onOpen()
When the editor opens, we still want it to set the editor <input> value. Nothing changes for the onOpen() hook.
onOpen($cell, editorField, mData) {
  if (!mData) {
    mData = editorField.value || '';
  }
  oDOMInput.value = String(mData);
},
onClose()
Similarly, the onClose() hook is expected to record the value of the picker to the editor. An additional step prior to this is to destroy the picker.
onClose(editorField) {
  // Destroy picker
  editorField.removeChild(picker);
  delete picker;

  // Update editor value
  return editorField.querySelector('input').value;
},