AI has come a long way in the last few years, but is it smart enough yet to provide meaningful analysis of your charts? That's what we're diving in today to see.
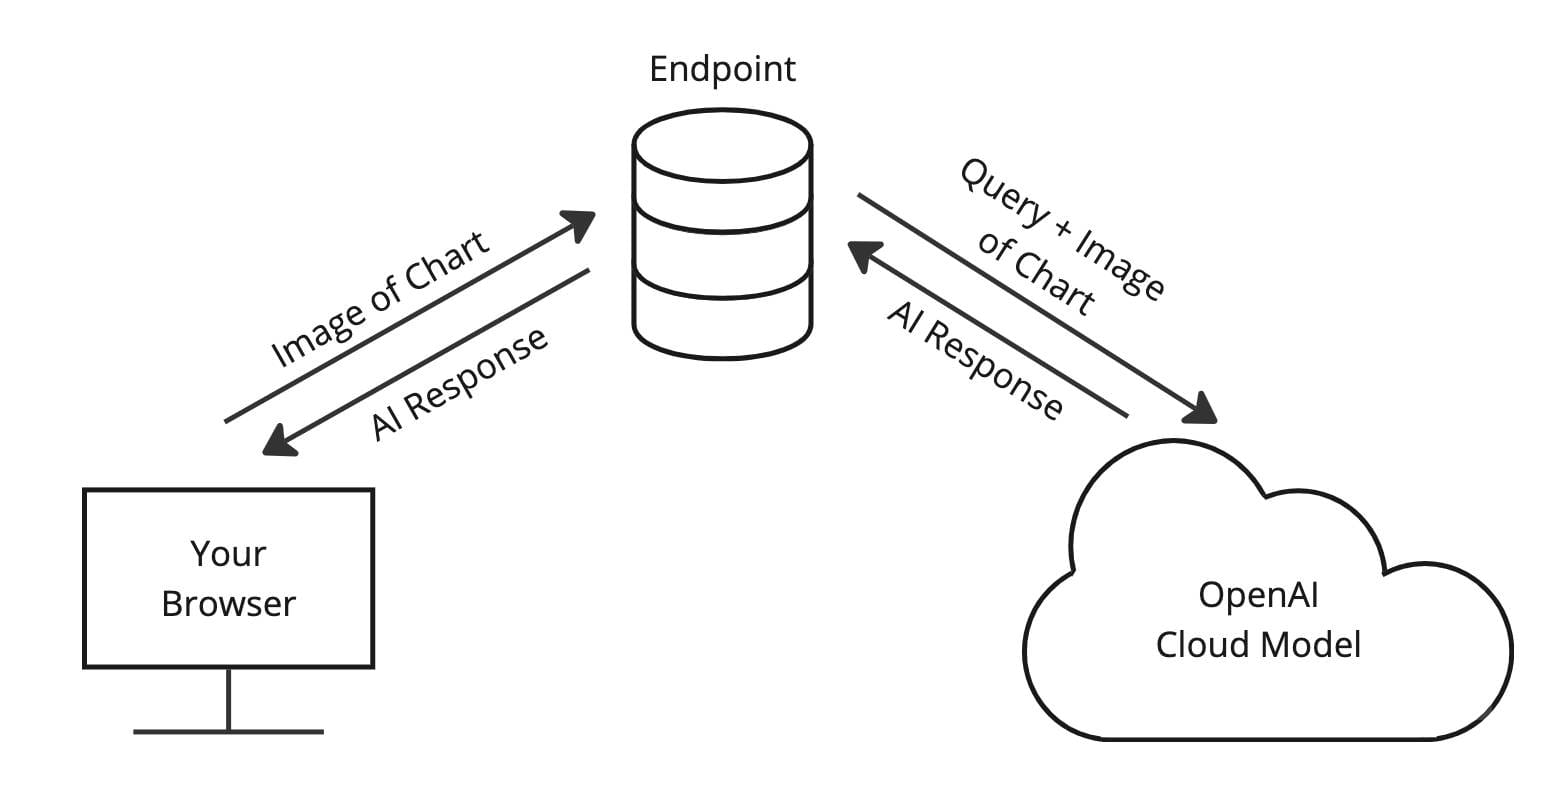
The first aspect we had to look at was how we would have AI "see" our chart. Thinking of the KISS principle, I decided the simplest method would be to send an image of the chart to the AI model along with a prompt via an API, then whatever the response was I would display on screen. I made a quick (and beautiful) diagram of what I was thinking:
Initial Setup
The first step in this whole process is to create a demo to hook the AI up to. Something with a simple chart (mine borrowed from the ZingChart demos section) for the AI to analyze and a section to display the output. Below is the demo that I created.
Extracting and Transmitting the Chart
Now that we have a skeleton to build off of, our next step is exploring how we can somehow extract a still image from an interactive library like ZingChart. Luckily it's much easier than I expected because that's a built in feature.
// 'myChart' - ID of the chart to export
zingchart.exec('myChart', 'getimagedata', {
  filetype: 'jpg', // 'png' and 'pdf' also supported
  callback : function(imagedata) {
    // The image is returned to us as a base64 encoded string, this is
    // what the imagedata parameter in this callback
  }
});
In our demo we'll create a clean async wrapper for this so that we can reuse it wherever we need in a single line with await
/**
 * Exports a given chart to a jpg image
 * @param {string} chartId The ID of the chart to export the image from
 * @return {string} The base64 encoded image data as a JPG
 */
async function exportChartImage(chartId) {
  return new Promise((resolve, reject) => {
    try {
      zingchart.exec(chartId, 'getimagedata', {
        filetype: 'jpg',
        callback: (imagedata) => resolve(imagedata),
      });
    } catch (err) {
      reject(err);
    }
  });
}
Next we'll set up the method to send this generated chart to our future endpoint. Note here that the body of the request does not need to be in any one specific shape since the endpoint hasn't been built yet so feel free to make it how you like.
/**
 * @param {string} chartId The ID of the chart to export the image from
 * @return {string} The AI's response of the image
 */
async function analyzeChart(chartId, endpointUrl) {
  // Create the request body for the AI request
  let reqBody = { chartImage: await exportChartImage(chartId) };

  try {
    let response = await fetch(endpointUrl, {
      method: 'POST',
      headers: {
        'Content-Type': 'application/json',
      },
      body: JSON.stringify(reqBody),
    });
    return await response.json();
  } catch (err) {
    console.error('Trouble reaching endpoint', err);
    return err;
  }
}
Creating the Endpoint
Our endpoint will be doing two things:
- Serving our static files to the client
- Acting as a proxy for the client and the OpenAI model. It will receive images and pass them along (with a prompt), and then it will pass the response back to the client.
To do this, we'll use a few packages:
npm i express openai dotenvThe first one being express, which we'll use to run the server itself. We'll start with a super simple server that serves the files from /public and converts incoming request bodies to JSON.
// Import dependencies
import express from 'Express';

// Create the server
const app = express();
const port = 3000;

// Convert incoming request bodies to JSON, allow submissions of up
// to 50mb to be sent (default is 100kb)
app.use(express.json({ limit: '50mb' }));

// Set a static directory
app.use(express.static('public'));

// Start listening for requests
app.listen(port, () => {
  console.log(`Server listening on port 3000`);
});
Next we'll create a route we can send our chart images to. Using the .post() method we can create a route that receives POST requests. We'll check to see if the body of the request has the necessary chartImage property and if not we'll respond appropriately.
// Hit OpenAI endpoint to analyze chart
app.post('/analyze-chart', async (req, res) => {
  if (!req.body.chartImage) {
    res.status(400).send('Missing chartImage}');
    return;
  }

  // TODO: Talk with AI here
  let chatCompletion;

  res.send(chatCompletion);
});
Connecting the Endpoint to OpenAI's API
Now, in order to talk with OpenAI's API, we'll first need to set up an account and pick a model to use. You can read about each of their models in their platform docs. For our use case, we were looking for a model that specifically had the Vision capability.
Many OpenAI models have vision capabilities, meaning the models can take in images and answer questions about them.
For this, we have many options, so we decided to go with gpt-4o-mini as we wanted a lightweight demo.

Once we have a model picked out and have gone through the process of generating a key, we head back to our server and import the rest of the packages that we will need.
// Import dependencies
import express from 'Express';
import OpenAI from 'openai';
import 'dotenv/config';

// Create the server
const app = express();
const port = 3000;

// Initialize OpenAI client
const aiClient = new OpenAI({
  apiKey: process.env.OPENAI_API_KEY
});

// Constants
const AI_MODEL = 'gpt-4o-mini';

// Convert incoming request bodies to JSON, allow submissions of up
// to 50mb to be sent (default is 100kb)
app.use(express.json({ limit: '50mb' }));

// Set a static directory
app.use(express.static('public'));

// Hit OpenAI endpoint to analyze chart
app.post('/analyze-chart', async (req, res) => {
  if (!req.body.chartImage) {
    res.status(400).send('Missing chartImage}');
    return;
  }

  // TODO: Talk with AI here
  let chatCompletion;

  res.send(chatCompletion);
});

// Start listening for requests
app.listen(port, () => {
  console.log(`Server listening on port 3000`);
});
In order for the dotenv package to be able to pull in our key and use it like we do above, as the name suggests we need to create a .env file in the root of our project with the following inside of it. It is CRITICAL that you add .env to your .gitignore file to avoid leaking your key online. Do not commit this key to your repo.
OPENAI_API_KEY=Your-Key-HereThe last thing we need to do for this endpoint is to finish setting up our /analyze-chart route. Note that in the previous endpoint code block we created a new client object from the OpenAI package we imported. We will use that client to connect to the OpenAI model like so. I chose to include the same query with every request, but you can also receive one from the client if you choose.
// Hit OpenAI endpoint to analyze chart
app.post('/analyze-chart', async (req, res) => {
  if (!req.body.chartImage) {
    res.status(400).send('Missing chartImage}');
    return;
  }

  let chatCompletion = await aiClient.chat.completions.create({
    model: AI_MODEL,
    messages: [
      {
        role: 'user',
        content: [
          {
            type: 'text',
            text: 'Give an analysis of the following chart',
          },
          {
            type: 'image_url',
            image_url: {
              url: req.body.chartImage,
            },
          },
        ],
      },
    ],
  });

  res.send(chatCompletion);
});
Displaying the Results
The only thing left is to spin up our server using node server.js and visit http://localhost:3000 in our browser to test it out
Looking at the OpenAI platform docs