I just wrote a blog post (you can read it here) on building a chart using REST APIs and the traditional AJAX request. While I'm sure you all are loving the XMLHttpRequest() API, there is a modern API we can use to make HTTP requests called, Fetch.

A lot of our users are using some more modern JavaScript to build out their web applications, so we figured now is the perfect opportunity to write about the Fetch API.
*Disclaimer: This tutorial is written in ES6 and uses some new concepts. Fetch is supported by most major browsers, so it is definitely viable to use it in production.

Table Of Contents
What Is Fetch?
Fetch is a JavaScript web API that allows us to make network requests. It is very similar to the XMLHttpRequest API, however it utilizes modern JavaScript patterns to do such in a more efficient way.
Fetch has three major benefits over the XMLHttpRequest API:
-
Ease of development. It's much easier to read and write.
-
Implements the use of promises. In short, promises allow us to control the flow of asynchronous JavaScript and dictate the order our functions run in.
-
The XMLHttpRequest API works with both the request and response to the network. Fetch exclusively works with the response so this makes things more straightforward.
The Fetch API allows us to request resources across the network, process the resources we request, and return these resources to the browser asynchronously. This is all illustrated in the diagram below.
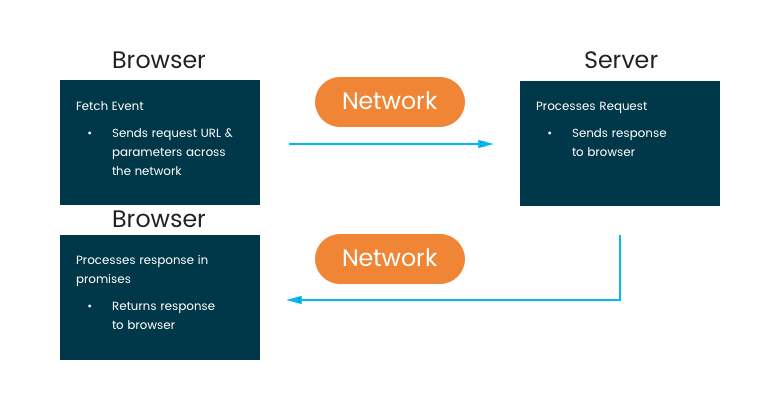
We will follow these 4 steps when using Fetch in this tutorial:
- Declaring a parameters variable and making the Fetch API call.
- Working with the response in the first promise.
- Working with data from the response in the second promise.
- Catching errors.
Let's move onto promises.
What Are Promises?
Fetch returns a promise by design. This actually makes it relatively easy to introduce promises. A promise is a callback function that is attached or returned from an existing function.
However, there is one caveat that gives a promise its distinct advantages over the traditional callback function. Promises wait until the previous function has been fulfilled to be executed.
This sounds like the typical synchronous behavior of Vanilla JavaScript. However, we can now ensure our asynchronous requests are executed in the order we please. All without blocking page render or other processes. The diagram below illustrates this point.
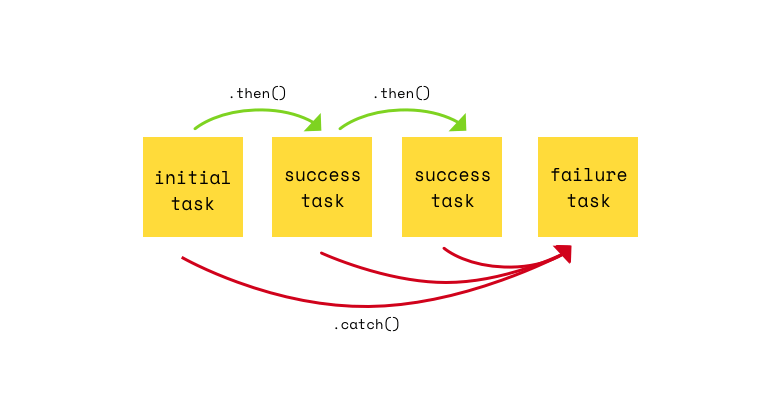
Promises can be chained together using the .then() method. Our code will subsequently run in linear order through our promise chain.
Promises also handle errors in a more efficient way than the traditional callback. Callbacks can catch errors in each part of the chain, however we find ourselves writing the same error catching code multiple times through our callback chain.
Promises allow you to chain an error handling catch() just once. This catch will check and catch errors in every part of promise chain and help us respond accordingly.
Fetch Example
Now that we have a proper background for what Fetch and promises are, we can jump right into this tutorial.
Fetch Call & Parameters
Before initializing the Fetch API, we must first define our request parameters. These parameters will give Fetch information about the network request we want to make. We will store our parameters in an object variable named requestParams.
const fetchParams = {
  method: 'GET',
  mode: 'cors'
};
Our first parameter is "method". Method refers to the type of network request we want to make. This can be any of the normal HTTP verbs like GET, POST, etc. We are retrieving data from the Star Wars API so we will set our "method" as "GET".
The second parameter is "mode". "mode" also refers to the type of network request being made. However, this time we will specify if we are fetching resources within our own domain or cross-origin from another domain.
The Star Wars API is cross-origin so we will set "mode" to "cors". "cors" stands for cross-origin resource sharing.
Our URL should be stored in a variable called url. We can place the URL directly inside of the fetch method, but I prefer creating a variable. It just keeps things cleaner.
const url = "https://swapi.co/api/people/";
To initialize Fetch we will call the fetch() method and place our requestParams and url variables as parameters. All together it should look like this:
const fetchParams = {
  method: 'GET',
  mode: 'cors'
};

const url = "https://swapi.co/api/people/";

fetch(url, fetchParams)
Promise 1
Fetch returns a promise by default. We can chain promises to functions using the .then() method. The .then() method takes in a callback function as a parameter.
Fetch returns a response object as a parameter. We can call properties and methods on this object to help work with the fetch response. This response object will be passed as a parameter into our callback function.
fetch(url, fetchParams)
  .then(res => {
    // do something
  })
We will begin our first promise by creating an if statement that checks if the server returns a status that is not "ok". If we do indeed receive a status that is not ok, we will throw an error. Our code will look like this:
fetch(url, fetchParams)
  .then(res => {
    if (!res.ok) {
      throw new TypeError(res.statusText);
    }
  })
The next piece of this promise will work with the response we receive if we receive a status of "ok".
The response object parameter in our function has built-in methods we can work with. Amongst these methods is .json(). We can call this method on our response object.
This will return another promise and the response body as JSON. Which will lead us into our second promise. Here's what this should look like:
fetch(url, fetchParams)
  .then(res => {
    if (!res.ok) {
      throw new TypeError(res.statusText);
    }
    return res.json();
  })
Promise 2
We can chain our second promise using the .then() method. .then() will take in a callback function with a data parameter. This data parameter refers to the data returned from the res.json() method in the first promise.
We will store our JSON data parameter in a variable called characters.
  .then(data => {
    const characters = data.results;
  }
Next, we will need to create an empty array and store it in a variable. We will eventually push values from our JSON data into this array. This will allow us to use this variable as a data option in our chart.
  .then(data => {
    const characters = data.results;
    let characterData = [];
  }
Since our JSON data is returned as an array of objects, we can use the forEach() method to loop through the characters variable. The forEach() method takes in a callback function. This function will take in a parameter called character.
The character parameter represents the current object we are looping through in our array of objects. It works kind of like [i] in a for loop. We can push values into the variable array using the .push() method.
We want to push the character name & height into our array. We can access both of these using dot notation on the character parameter of our function.
Finally, we will use the parseInt() method to convert the height value from a string to a number. This will make it easy to use in our chart later. Our code should look like this:
  .then(data => {
    const characters = data.results;
    let characterData = [];
    characters.forEach(function(character) {
      characterData.push([character.name, parseInt(character.height)]);
    });
  }
Catch
After our chain of promises, we can chain the .catch() method. This is designed to catch any errors along the promise chain. Traditional callbacks need to utilize error tracking within each callback. This leads to a lot of repeat code.
Promises allow you to just do this once at the end. The catch() method takes in a function with the built in error object as a parameter. For this tutorial all we will do is console.log() the error. Here's what it will look like:
.catch(err => {
    console.log("Error Getting Data From Star Wars API");
  });
ZingChart
There's really only two things we need to do to render a chart; create a chart configuration variable and call the zingchart.render() method. ZingChart will do the rest.
*All of our ZingChart code will be placed inside of our second promise right after the forEach() method.
Creating A Chart Configuration
First, we need to create an object that will be stored in variable. There are two things we need to define within this object:
-
type: 'bar'| This will create a bar chart -
series: {values: {[{characterData}]}}| This will insert thecharacterDatavariable we pushed values into earlier as our chart data.
var chartOneData = {
  type: 'bar',
  series: [
    {
      values: characterData
    }
  ]
};
Chart Render
ZingChart has a built-in render method to render a chart. This method takes in an object, where we place four items:
id: 'chart-one'| This is the id of our chart container<div>in our HTML.data: chartOneData| This is the name of our chart configuration variableheight: '100%'| This can be whatever you wantwidth: '100%'| This can be whatever you want
zingchart.render({
  id: 'chart-one',
  data: chartOneData,
  height: '100%',
  width: '100%'
});
Full Code
HTML
<div id="chart-one"></div>
CSS
#chart-one {
  height: 75%;
  width: 80%;
  margin: 0 auto;
}
JavaScript
const fetchParams = {
  method: "GET",
  mode: "cors",
  cache: "default"
};

const url = "https://swapi.co/api/people/";

fetch(url, fetchParams)
  .then(res => {
    if (!res.ok) {
      throw new Error(res.statusText);
    }
    return res.json();
  })
  .then(data => {
    const characters = data.results;
    let characterData = [];
    characters.forEach(function(character) {
      characterData.push([character.name, parseInt(character.height)]);
    });
    const chartOneData = {
      type: "bar",
      title: {
        text: "Fetch + REST API Endpoint Demo",
        adjustLayout: true
      },
      scaleX: {
        item: {
          angle: '-45'
        }
      },
      series: [
        {
          values: characterData
        }
      ],
      plotarea: {
        margin: 'dynamic'
      }
    };
    zingchart.render({
      id: "chart-one",
      data: chartOneData,
      height: "100%",
      width: "100%"
    });
  })
  .catch(err => {
    console.log("Error Getting Data From Star Wars API");
  });