This is the first post in ZingChart’s Stopwatch Features series. The purpose of this series is to highlight many of ZingChart’s features that can be quickly implemented to make your charts dynamic, interactive, and animated.
Watch the short video below to see how quickly and easily you can add different types of animations to your line charts. For a step-by-step summary, scroll past the video.
As a quick guide, here are the points I will go over to animate your line chart:
- Create a basic HTML layout that will render your chart
- Add an object within your JavaScript to contain your data, properties, and animations
- Call ZingChart to render the chart to your page
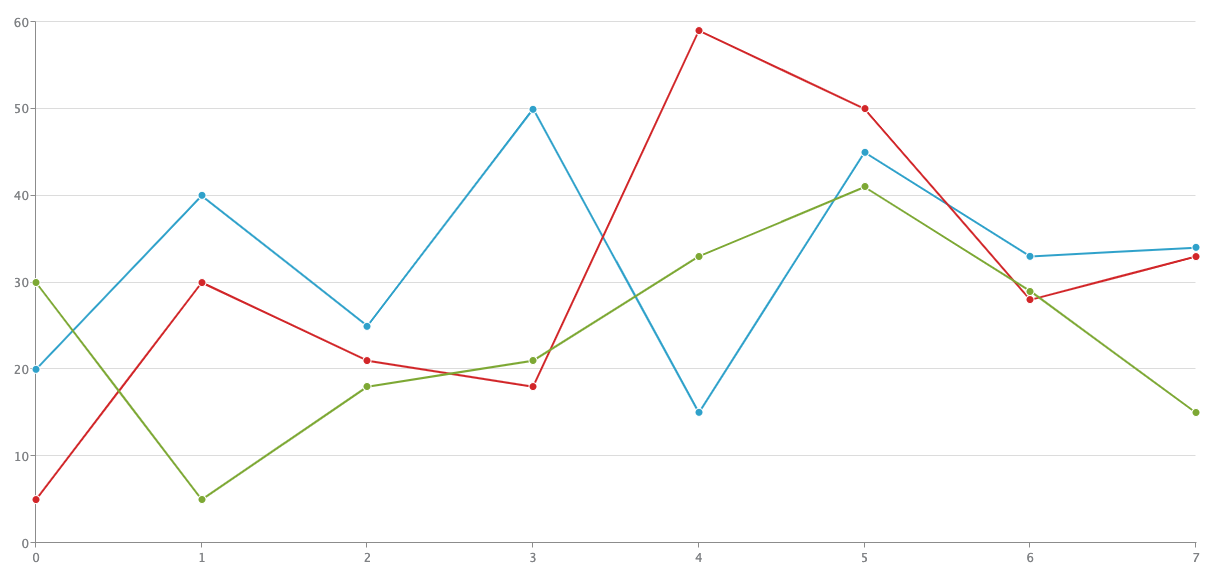
While you can certainly use your own data and design, for the purpose of this demo, I will use the chart below with 3 plot groupings.

Before I get started…
I highly recommend signing up for ZingChart’s free web-app, the ‘ZingSoft Studio’.
This will give you full access to the ZingChart library in a sandbox-like environment. The Studio will allow you to create fully functional charts and grids while adding your animations at the same time.
Check out the Studio and start charting!
Creating Your Layout
To start, you will need to create a basic HTML layout. Feel free to copy the one below.
<!DOCTYPE html>
<html>
   <head>
   <meta charset="utf-8">
   <title>Line Chart Animation Demo</title>
   <script src="<https://cdn.zingchart.com/zingchart.min.js>">
</script>
   </head>
   <body>
      <div id='myChart'></div>
   </body>
</html>
Notice I have already included the script tag which references ZingChart’s CDN as well as the div to render the chart.
Adding Your JavaScript
Once you have finished setting up your HTML, you will want to add your JavaScript.
Either create a script tag below where you set up your chart div or reference a new JavaScript file. While I will only be scratching the surface of what ZingChart can do, the only two JavaScript components you will add to animate your chart are a variable and a render method.
Creating Your Variable
You will start by creating and naming a variable as an object within a JavaScript file or script tag. Within this object, you will want to include 3 main properties: type, series, and plot.
Reference the format below.
var myConfig = {
   "type": "line",
   "series": [
      {"values": [20,40,25,50,15,45,33,34] },
      {"values": [5,30,21,18,59,50,28,33] },
      {"values": [30,5,18,21,33,41,29,15] }
   ],
   "plot": {

   }
};
The type property specifies what type of chart you are looking to utilize. ZingChart has over 35 chart types, but for this post, I will be going over line charts, hence the type property has a property value of line.
The series property is where you will store your data, change the line colors, add hover effects, and many more customizations you can read about here. Notice the formatting of the series property. To add multiple plotted lines, I made series an array with multiple objects as its properties.
If you save this file and open it in your browser, you will see you have a fully functional line chart.
Adding Animations
To animate your now rendered chart, it is as simple as adding a few more properties to your plot object.
The first thing you will want to do is give your plot object a property called animation. animation is an object that takes in all the ZingChart properties used to animate your chart.
The first property you will add to animation is effect. This can either take in a string or a number as a value. For the purpose of this demo, I will use numbers. Your main object should look like the code below but try switching out the values with any number between 1 and 13. I have provided the animation characteristics for values 1 - 13 below.
var myConfig = {
   "type": "line",
   "series": [
      {"values": [20,40,25,50,15,45,33,34] },
      {"values": [5,30,21,18,59,50,28,33] },
      {"values": [30,5,18,21,33,41,29,15] }
   ],
   "plot": {
      "animation": {
         "effect":1
      }
   }
};- 1 = Fade in
- 2 = Expand vertical from center
- 3 = Expand from top
- 4 = Expand from bottom
- 5 = Expand left to right
- 6 = Expand from right to left
- 7 = Expand horizontal from center
- 8 = Slide from left
- 9 = Slide from right
- 10 = Slide from top
- 11 = Slide from bottom
- 12 = Unfold horizontal
- 13 = Unfold vertical
The next property you can add to animation is sequence. This property can take in values between 1 and 3.
sequence decides what order the lines on the chart will be animated. I encourage you to try out different property values between 1 and 3 to get a better idea as to how they affect the animation itself.
var myConfig = {
   "type": "line",
   "series": [
      {"values": [20,40,25,50,15,45,33,34] },
      {"values": [5,30,21,18,59,50,28,33] },
      {"values": [30,5,18,21,33,41,29,15] }
   ],
   "plot": {
      "animation": {
         "effect": 1,
         "sequence": 1
      }
   }
};- 1 = Lines appear by plot group
- 2 = Lines appear by node group
- 3 = Lines appear by individual node
Lastly, speed is the property that will determine the overall speed of the animation. Try using values between 1 and 100.
var myConfig = {
   "type": "line",
   "series": [
      {"values": [20,40,25,50,15,45,33,34] },
      {"values": [5,30,21,18,59,50,28,33] },
      {"values": [30,5,18,21,33,41,29,15] }
   ],
   "plot": {
      "animation": {
         "effect": 1,
         "sequence": 1,
         "speed": 10
      }
   }
};
Rendering Your Chart
The last piece of JavaScript you will need to add is the zingchart.render() method.
Once that is added, your full JavaScript file should look like this:
var myConfig = {
   "type": "line",
   "series": [
      {"values": [20,40,25,50,15,45,33,34] },
      {"values": [5,30,21,18,59,50,28,33] },
      {"values": [30,5,18,21,33,41,29,15] }
   ],
   "plot": {
      "animation": {
         "effect": 1,
         "sequence": 1,
         "speed": 10
      }
   }
};
zingchart.render({
   id: 'myChart',
   data: myConfig,
   height: "100%",
   width: "100%"
});
As far as animation goes, you are done!
There are many different combinations of effect sequence and speed that you can take advantage of. I encourage you to play around with various combinations to see what best fits your needs. There are also many other properties you can include within the plot object to add interactivity to your chart. You can play around with this demo here.

A pioneer in the world of data visualization, ZingChart is a powerful JavaScript library built with big data in mind. With over 35 chart types and easy integration with your development stack, ZingChart allows you to create interactive and responsive charts with ease.