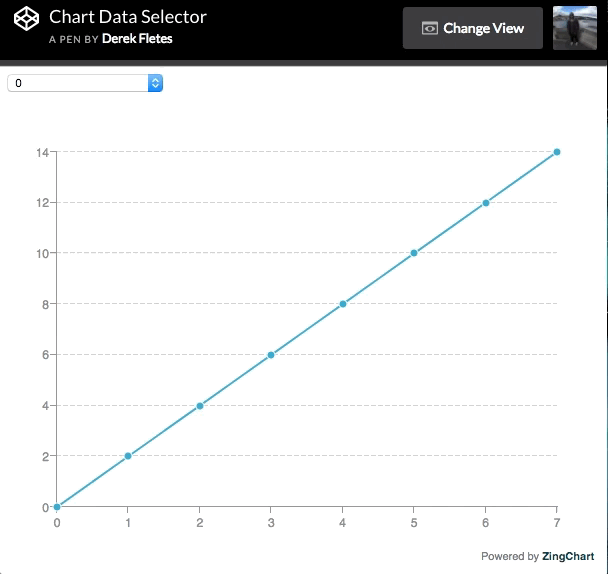
There are a few fundamental chart interactions that are commonly used around the internet to exhibit data. One of these interactions is to change datasets with drop-down options. Here is an example below:
This tutorial will outline how to execute this with a little bit of JavaScript & ZingChart.
Table Of Contents
HTML
First, we need to create a <div> element. This <div> element will contain our chart and drop-down. We will give this <div> a unique ID so that we can reference it in our CSS & JavaScript later.
Next, we will create a <select> element that contains 3 <options> elements. We will give our <select> element a "name" attribute to make it easier to query it from the DOM in our JavaScript.
Each of the <options> elements will represent a different dataset that will be called in our JavaScript. Giving each of these <options> elements a unique "value" attribute will allow us to reference them in our JavaScript later. Here is the example code below:
<!-- Chart container -->
<div id="myChart">

  <!-- Drop-down -->
  <select id="chart-selector" name="chart-selector">

    <option value="">Please Select An Option</option>
    <option value="0">0</option>
    <option value="1">1</option>

  </select>

</div>
CSS
Our CSS will be very short. All we need to do is define a height & width for our chart container. If we fail to do this, our chart will not render. Here is the code below:
#myChart {
  height: 500px;
  width: 600px;
  margin: 0 auto;
}
JavaScript
The JavaScript portion of our code will be the most comprehensive. I will break it down into four steps.
Step 1: Data
There are many ways to connect data to charts. For this example, I created two simple mock data sets and stored them in variables so that we can reference later.
var firstDataSet = [0, 2, 4, 6, 8, 10, 12, 14];
var secondDataSet = [0, 1, 2, 3, 4, 5, 6, 7];
Step 2: Chart
We can create an instance of ZingChart by declaring a variable that will equal a JavaScript object. There will be four important key/value pairs of ZingChart attributes to place into our JavaScript object:
-
type: Defines the chart type.
-
plot: {animation: {}}: Defines animation attributes.
-
scaleY: Defines the y-axis scale values.
-
series: Defines the chart data values.
var myConfig = {
  type: 'line',
  plot: {
 	  animation:{
 	    effect: 4,
 	    method: 0,
            speed: 500,
 	    sequence: 1
 	  }
 	},
  scaleY: {
    values: '0:14:2'
  },
  series: [
    {
      values: null
    }
  ]
};
Step 3: Chart Render
In order to render our chart, we will need to use the zingchart.render() method. This takes two key/value pairs. They will be our chart ID & the variable our chart object is stored in.
zingchart.render({
  id: 'myChart',
  data: myConfig
});
Step 4: Event Listeners & ZingChart API Call
Each of our interactions will occur when a user interacts with the DOM. To achieve this interaction, we will use a combination of variables, event listeners, & functions.
First, we need to grab our <select> element from the DOM and store it in a variable. We can do this by using the unique "name" attribute we declared in our HTML:
var select = document.querySelector('select[name="chart-selector"]');
Next, we need to add an event listener to this variable that occurs on "change". In this case, "change" occurs when the state of a <select> element has changed.
Then we must define a function to occur when this event occurs. We can attach a dataset to each "change" using conditions in an if statement.
We can use event.target.value to return the "value" attribute of the <option> element that has "changed". This is where our if statement comes into play.
If "value" equals "0" do something, if "value" equals "1" do something else, if it doesn't equal either of these do something else. In this case, the "something" will be our ZingChart API call adding series values to our chart.
To make a ZingChart API call, we use the zingchart.exec() method. This method takes in the ID of the chart we want to modify, the ZingChart API method we want to apply, and the new ZingChart attributes that will be applied.
The method we want to use is 'setseriesvalues', which loads data into a chart. We will use this to load data into each selection the user makes.
The last thing we need to do is insert key/value pairs of ZingChart attributes to make this work. We will use plotindex to define which chart to execute this on, which is 0 in this case because it is the only chart we are working with.
Then finally, we will define the values. In this case, it will be one of the two mock data sets we stored in variables. Here is the finished JavaScript below:
// Add event listener to fire on selection
select.addEventListener('change', function() {
  if (event.target.value == '0') {
    zingchart.exec('myChart', 'setseriesvalues', {
      plotindex: 0,
      values: firstDataSet
    });
  } else if (event.target.value == '1') {
    zingchart.exec('myChart', 'setseriesvalues', {
      plotindex: 0,
      values: secondDataSet
    });
  } else {
    alert('Please Select An Option');
  }
});