We've released an updated post for Angular 2.0.0 RC4. Read it here
We've re-released an updated post for Angular 2.0.0 RC5. Read it here
Here at ZingChart, we are big Angular fans. A few of our internal tools are built upon it, and we even built an Angular directive wrapped around our charting library: ZingChart-AngularJS Directive. We are also getting ready for Angular 2. We’re watching each step in the library’s development and checking out the latest developments.
When Angular 2 reached their first beta, we decided to see how well ZingChart would integrate with the new framework. Since then, we’ve developed an Angular 2 example with ZingChart.
Stay tuned for an official ZingChart Component for Angular 2 when the framework reaches maturity. But this example is uses the current Angular 2 release (beta-9), so syntax and ideas are subject to change.
Angular 2 is a pretty vast departure from its first iteration.
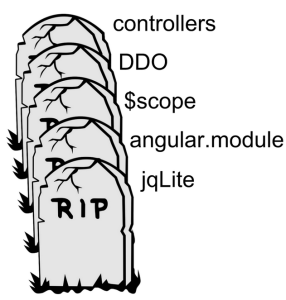
Many of Angular's core fundamentals have been done away with, such as:
-
Controllers
-
Directive Definition Objects
-
$scope
Angular's lifecycle has been reworked and modified to use new concepts. The familiar $scope.$apply() to signal a manual change is no longer needed. The framework's source isn't even written in vanilla JavaScript! Even worse, Angular 2 is not backwards compatible with Angular 1!

Put those pitchforks (and tridents) away. The Angular 2 hate train has come and gone.
Web Components
While these changes signify an end to AngularJS 1, the team responsible for Angular made it clear that AngularJS applications will continue to receive support and there will be a clear path to migrating to Angular 2.
In fact, you can easily use Angular 2 components inside of your Angular 1 application to make the transition seamless: https://angularjs.blogspot.com/2015/08/angular-1-and-angular-2-coexistence.html
These changes are necessary to evolve with the web community and the direction towards which it is headed: Web Components. Web Components aim to be an industry standard where developers can create encapsulated building blocks. In turn, these blocks can create even bigger pieces to develop into an application.
They aim to ease development by creating a declarative environment where complex logic can be contained, while interfaces and APIs can be clearly exposed.
Angular 2 isn't the first to do it : React and Polymer are two alternative frameworks that embrace the idea of Web Components, and share a lot of similarities with Angular 2.
Typescript
As for the choice of TypeScript as the default language, it seems like a natural fit. TypeScript is a superset of ES6 (the next iteration of JavaScript) and comes with a slew of features such as:
-
Types
-
Generics
-
Interfaces.
Big projects such as Angular 2 will benefit from the added syntax, by improving maintainability and compile-time reassurance for a project that will last many years. While Angular 2 is offered in different flavors including ES6 and Dart, we highly recommend sticking with TypeScript if you choose to develop with Angular 2.
Being able to reference the source code of the framework, and to understand code snippets from most of the Angular 2 articles written with TypeScript will make developing much less painful.
With that being said, let's dive into an Angular 2 example using TypeScript!
Angular 2 Example: Hello World
The scope of this article assumes you have basic knowledge of ZingChart, TypeScript, and ES6 modules. An introduction to Angular 2 is recommended, but not required. If you are unfamiliar with any of these technologies, we recommend the following links:
We start off by setting up a simple boilerplate which includes ZingChart, Angular 2, and polyfills for browsers that are incompatible with some of Angular 2’s dependencies. You can follow along by forking this starter plunker : https://plnkr.co/edit/Z4ruHyfmBwxUT9Iov7QP, or you can skip ahead to a completed version : https://plnkr.co/edit/PDR1egLEzrAdETcoQdfc .
index.html
<!DOCTYPE html>
<html>
  <head>
    <title>ZingChart + Angular 2</title>
    <script src="https://code.angularjs.org/2.0.0-beta.6/angular2-polyfills.js"></script>
    <script src="https://code.angularjs.org/tools/system.js"></script>
    <script src="https://code.angularjs.org/tools/typescript.js"></script>
    <script src="https://code.angularjs.org/2.0.0-beta.6/Rx.js"></script>
    <script src="https://code.angularjs.org/2.0.0-beta.6/angular2.min.js"></script>
    <script src="https://code.angularjs.org/2.0.0-beta.6/http.min.js"></script>
    <script src="https://cdn.zingchart.com/zingchart.min.js"></script>
    <script>
    System.config({
      transpiler: 'typescript',
      typescriptOptions: {
        emitDecoratorMetadata: true
      }
    });
    System.import('app.ts')
      .catch(console.error.bind(console));
  </script>
  </head>

  <body>
  </body>

</html>
Dependencies
We include a number of dependencies inside of our HTML file. The majority of these dependencies will not be needed for production code if you intend on compiling and bundling the code. Going into each of these dependencies in detail would be enough information for another article in itself, so in short :
-
angular2-polyfills.js - Needed for zone.js and reflect-metadata
-
system.js - A module loader
-
typescript.js - A client-side version of the language TypeScript
-
Rx.js - Observables
-
angular2.min.js - Angular 2
-
http.min.js - The HTTP class
-
zingchart.min.js - The ZingChart library!
We utilize a library called SystemJS as a polyfill for the upcoming es6 require syntax. This allows us to pull in files dynamically into our application, similar to how require works in Node.js.
The line System.import('app.ts') brings in our external file app.ts via ajax to be interpreted by the browser. Let's look at that file now.
app.ts
import {bootstrap} from 'angular2/platform/browser';
import {Component, NgZone, AfterView, OnDestroy} from 'angular2/core'

@Component({
  selector: 'my-app',
  template: `
    <div>
      <h2>Hello {{name}}</h2>
    </div>
  `
})
class App {
  constructor() {
    this.name = 'World'
  }
}

bootstrap(App, [])
  .catch(err => console.error(err));
We utilize es6's import statement to include two important functions into our application. bootstrap is our injection point to start the Application. Angular takes in our root component App and traverses through its dependency tree creating components and appending them to the DOM.
Component, NgZone, AfterView, and OnDestroy will be discussed later in the article ,but we include it now for completeness.
Classes
The class notation is new to ES6/TypeScript. It is syntactic sugar on top of Prototypes in JavaScript which allows for Object-Orientation and inheritance. Classes allow developers to abstract logic cleanly without developers creating their own abstractions of other OOP based libraries.
Classes are essential in Angular 2, so let's look at our first Class App. It has a single constructor function which initializes the attribute name to a string World. We can pass this Class definition to Angular's bootstrap function to create our first component; the root component.
Directly on top of the class, we decorate it with the function @Component. This function is an Angular module that decorates our class with Angular syntax. The first property selector allows our component to be referenced declaratively from the DOM as a custom element. In this example, the element <my-app></my-app> acts as an injection point for our App component.
The template property allows additional DOM content to be injected inside of our component. Note the new back-tick ` syntax available in ES6. This allows us to break up our HTML string visually without having to concatenate strings together. The {{}} syntax is familiar to those coming from an Angular 1 background.
We utilize this syntax to interpolate our class variables directly into our string template. The name property that we instantiated in our constructor is available from inside our template by calling the variable {{name}} inside of the brackets. We then set our template to have a h2 element wrapped inside a div.
Finally, let's add our newly created component into the <body> of our index.html page.
<my-app>
  loading...
</my-app>
In the browser, Angular will detect our new app and compile it to output the following :
<div>
  <h2>Hello World</h2>
</div>
Angular 2 Charts : Adding ZingChart
Now that we have an Angular 2 example application running, let's add ZingChart to the application.
Creating a model
class Chart {
  id: String;
  data: Object;
  height: any;
  width: any;
  constructor(config: Object) {
    this.id = config['id'];
    this.data = config['data'];
    this.height = config['height'] || 300;
    this.width = config['width'] || 600;
  }
}
First, we create a class called Chart that will contain four properties :
-
id
-
data
-
height
-
width
Inside of our constructor, we initialize each Chart using the same configuration object used inside of the zingchart.render function, and pass those properties to our members. The height and width are optional parameters and default to 300 and 600 respectively. This class will act as our Model, and will provide the uniformity we need to create our charts.
Creating the ZingChart Component
Next, we create another class that will handle creating each chart. We call this component ZingChart which will contain a single instance of the Chart class we just created.
class ZingChart implements AfterViewInit, OnDestroy {
  chart : Chart;
  ngAfterViewInit() { }
  ngOnDestroy() { }
}
We utilize TypeScript's ability to accept interfaces for our class. We implement the interfaces OnDestroy and AfterViewInit. These interfaces hook into Angular's lifecycle events and allow us to perform actions during this event sequence. Two such events we will use in this example are AfterViewInit and OnDestroy.
AfterViewInit is called when the component's view has been fully initialized. This allows us to prepare the DOM before the ZingChart library injects itself into the <div> we provide in our template. OnDestroy notifies us when the component will be destroyed.
This is perfect for cleaning up each chart. We'll create stub functions for now by prefixing each event name with ng. Our single public member in this example is an instance of our Chart class.
Next, we decorate the ZingChart Class.
@Component({
  selector : 'zingchart',
  inputs : ['chart'],
  template : `
   <div id='{{chart.id}}'></div>
  `
})
class ZingChart implements AfterViewInit, OnDestroy {
  chart : Chart;
  ngAfterViewInit() { }
  ngOnDestroy() { }
}
We designate the keyword zingchart as a selector for our new component. The inputs parameter allows us to take any number of inputs from a Parent component to be accessible inside our class. In this example, we accept a single input chart which corresponds to the chart member in our class. The template simply renders out a <div> element to allow the ZingChart library to attach itself to.
Informing our App Component
Before proceeding any further without ZingChart component, let us notify our parent component, App that we have a new component to be utilized.
@Component({
  selector: 'my-app',
  directives: [ZingChart]
  template: \`
    <zingchart *ngFor="#chartObj of charts" [chart]='chartObj'></zingchart>
  `,
})
export class App {
  charts : Chart[];
  constructor() {
    this.name = 'Angular2'
    this.charts = [{
      id : 'chart-1',
      data : {
        type : 'line',
        series : [{
          values :[2,3,4,5,3,3,2]
        }],
      },
      height : 400,
      width : 600
    }]
  }
}
We expand our App class by adding a member charts to hold all of the charts in our application. This will be of type Chart[], which is an array of Chart objects. Inside of our constructor, we initialize a new Chart object to be stored within this array.
Inside of the decoration, we add our component into the directives parameter, and modify our App's template to render out a single chart. The *ngFor syntax allows us to create N charts, based upon our Class's charts member.
Rendering a chart
Back at our ZingChart class, let's implement how our chart renders.
    class ZingChart implements AfterView, OnDestroy {
      chart : Chart;
      constructor(private zone:NgZone) {
      }

      ngAfterViewInit() {
          this.zone.runOutsideAngular(() => {
              zingchart.render({
                  id : this.chart['id'],
                  data : this.chart['data'],
                  width : this.chart['width'],
                  height: this.chart['height']
              });
          });
      }
      ngOnDestroy() {
          zingchart.exec(this.chart['id'], 'destroy');
      }
    }
Zones
Inside of our constructor, we introduce a new concept : Zones.
"A Zone is an execution context that persists across async tasks. You can think of it as thread-local storage for JavaScript VMs."
In a nutshell, Angular 2 utilizes zones for change detection and eliminates having to use $scope.$apply or $digest from Angular 1 to update our UI. It handles all of that in the background for us by attaching itself to browser events including window.setTimeout and window.setInterval.
For more information, head over to Zone.js's github repository https://github.com/angular/zone.js.
So why is this important to our ZingChart example? ZingChart relies on window events such as window.setTimeout and window.setInterval for updating visual changes such as tooltips or highlighted state on the chart.
By default, Zone.js will listen of these events as well and treat them as part of the applications lifecycle -- not good! We do not want the small visual changes that ZingChart provides to be listened to by Angular. Therefore, we need to render each chart outside of the zone.
We accomplish this by wrapping our zingchart.render function inside of the zone.runOutsideAngular function. Inside of the zingchart.render function, we pass in our chart instance's members to render out the chart.
Finally, we modify our ngOnDestroy hook to properly destroy our charts when Angular needs to re-render the view. We utilize the ZingChart API method call destroy.
Now run the page and you should see a chart appear on your page. Congrats! You have created your first chart using ZingChart inside of Angular 2!
For a complete working example, see : https://plnkr.co/edit/PDR1egLEzrAdETcoQdfc
Looking towards the future
We hope you enjoyed our explanation of this Angular 2 example. When the Angular 2 framework reaches a point of maturity or when it becomes officially released, we will provide an official ZingChart Component complete with API integration similar to our ZingChart AngularJS directive for Angular 1.
If you have any suggestions on features that would be useful in our future component, please share your thoughts in the comments below.