This is part 3 of a 4 part series covering all of the big changes in 1.7.2 - This time we are covering what Dexie Cloud is, and how we can use the new ZingGrid adapter to get some live collaboration going between grids across multiple clients. Here is the link if you missed part 1 giving a brief overview of all new 1.7.2 features, and here is the link if you missed part 2 covering Supabase.
What is Dexie Cloud?
Dexie.js: Self described as a minimalistic wrapper for the IndexedDB API, this library simplifies the browser's built in database API (which definitely needs it).
DexieCloud: the accompanying cloud service offered by the creators of Dexie.js. Extends your applications from being local-only to local-first with cloud backups and synchronization.
Setting Up the Essentials
In order to get setup with Dexie Cloud we'll first need a basic local server to run our app in a browser. Any will do so feel free to use your favorite, but for the purpose of this demo we'll go with Vite.
If you'd like to use Vite as well, simply run the following and follow the prompts as they appear
npm create vite@latest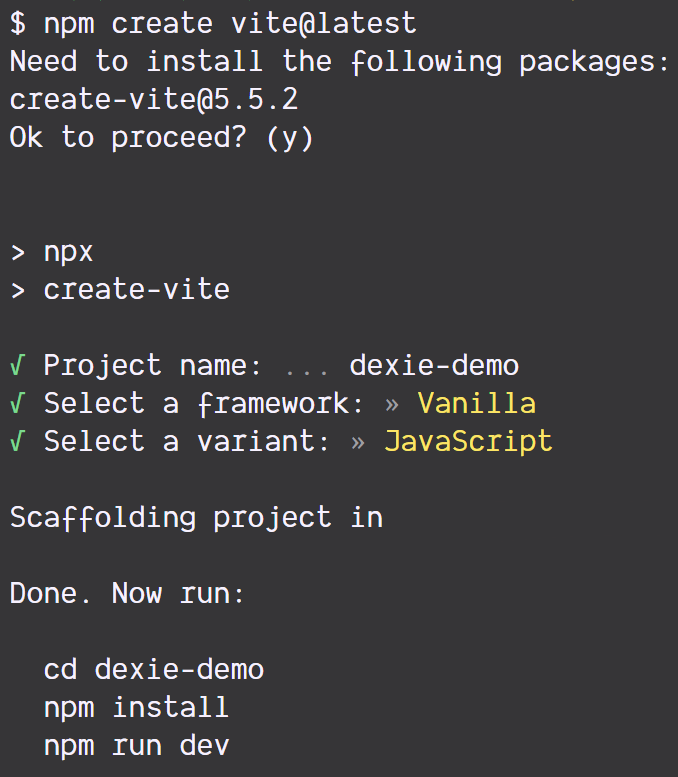
⚠️NOTE⚠️ : Make sure to run the commands that Vite tells you to run afterwards. In my case that is:
cd dexie-demo
npm install
npm run dev
But the directory to change into will depend on what you named your project.
Creating a Simple ZingGrid
Next we'll create a simple grid in order to have something to even connect to Dexie Cloud with. You can make the grid however you like, but we'll give it the following columns: first_name, last_name, and title
The below HTML we'll be using to replace the existing HTML found inside of index.html, one of the files that Vite created.
<!DOCTYPE html>
<html lang="en">
  <head>
    <meta charset="UTF-8" />
    <meta name="viewport" content="width=device-width, initial-scale=1.0" />
    <title>Dexie.js ZingGrid</title>
    <!-- ZingGrid -->
    <script src="https://cdn.zinggrid.com/zinggrid.min.js"></script>
  </head>
  <body>
    <zing-grid title="Dexie Grid" editor-controls>
      <zg-colgroup>
        <zg-column index="first_name"></zg-column>
        <zg-column index="last_name"></zg-column>
        <zg-column index="title"></zg-column>
      </zg-colgroup>
    </zing-grid>
  </body>
</html>
We can start up the server using npm run dev Rendering that on screen there is not much there yet as we have not given it any data, but we can see that library has loaded correctly and hydrated our <zing-grid> component

Configuring Dexie Cloud
Next we need to configure our Dexie Cloud backend so that it's ready to receive data from our grid. We'll be following along using their getting started guide, so if any of the instructions from this post stop working, check to see if that guide has updated first.
Step 1 - Create your database in the cloud
npx dexie-cloud createRunning the above command will take you through a few prompts in which you will create an account right from the command line. Once finished, two new files will appear: dexie-cloud.json and dexie-cloud.key. These are important for connecting to our backend service, but we won't need to manually interact with them.
Step 2 - Whitelist your app origin(s)
Since Vite defaults to the port 5173 that's what we're going to whitelist here, but be sure to make any adjustments if you are using another server / port.
npx dexie-cloud whitelist http://localhost:5173Step 3 - Upgrade Dexie + install dexie-cloud-addon
npm install dexie@latest
npm install dexie-cloud-addon
Hooking It All Together
Now that we have all of the pieces, we just need to assemble. First, heading back to that index.html file we modified, we're going to add a few dependencies. Notably, in the head we'll add the Dexie CDN and link to a main.js file.
Then, to let ZingGrid know that we're using an adapter, inside of our grid we'll add a <zg-data adapter="dexieCloud"> component to our grid (you can read more about ZingData's adapters in the docs here). This component will have some <zg-param>s that we'll use to specify details about the table. The table name we're making up for now as we'll create it in the next portion.
<html lang="en">
<head>
  <meta charset="UTF-8">
  <meta name="viewport" content="width=device-width, initial-scale=1.0">
  <title>Dexie.js ZingGrid</title>
  <!-- ZingGrid -->
  <script src="https://cdn.zinggrid.com/zinggrid.min.js"></script>
  <!-- Dexie -->
  <script src="https://unpkg.com/dexie@3.2.2/dist/dexie.min.js"></script>
  <!-- Main Script -->
  <script src="main.js" type="module"></script>
</head>
<body>
  <zing-grid title="Dexie Grid" editor-controls>
    <zg-data adapter="dexieCloud">
      <zg-param name="dataTable" value="employees"></zg-param>
      <zg-param name="subscription" value="true"></zg-param>
    </zg-data>
    <zg-colgroup>
      <zg-column index="first_name"></zg-column>
      <zg-column index="last_name"></zg-column>
      <zg-column index="title"></zg-column>
    </zg-colgroup>
  </zing-grid>
</body>
</html>
In the main.js script that we linked to above we're going to delete the boilerplate that came with Vite. Next, we import Dexie, its cloud add on, and liveQuery which will allow us to perform live synchronization across our grids.
import Dexie from 'dexie';
import dexieCloud from 'dexie-cloud-addon';
import { liveQuery } from 'dexie';
Next, we need to create a new Dexie database, here's we'll call it "EmployeeDB" since our example will be a table of employees.
const db = new Dexie('EmployeeDB', { addons: [dexieCloud] });Next we need to create a store for our table in our database. Since we named our table "employees" we'll use that as the name for our store. Then we'll specify the same columns we gave to our table in the markup.
db.version(1).stores({
  employees: '@id, first_name, last_name, title',
});
Once the store is configured, we need to configure the database to point to the cloud endpoint we set up earlier. Inside of dexie-cloud.json there is a value under "dbUrl" - this is the URL we'll use here.
db.cloud.configure({
  databaseUrl: 'https://zaojoytna.dexie.cloud',
});
Now that the database has been setup and connected, we just need to register it with ZingGrid. We will register liveQuery as well as a "subscription" so that ZingGrid knows to use it to check for updates.
ZingGrid.registerClient(db);
ZingGrid.registerClient(liveQuery, 'subscription');
Finally, we need to make sure to pull down the latest updates on load so we will sync the database with the cloud.
db.cloud.sync();All together you should have the following:
import Dexie from 'dexie';
import dexieCloud from 'dexie-cloud-addon';
import { liveQuery } from 'dexie';

const db = new Dexie('EmployeeDB', { addons: [dexieCloud] });

db.version(1).stores({
  employees: '@id, first_name, last_name, title',
});

db.cloud.configure({
  databaseUrl: 'https://zaojoytna.dexie.cloud',
});

ZingGrid.registerClient(db);
ZingGrid.registerClient(liveQuery, 'subscription');

// Sync with Dexie Cloud
db.cloud.sync();
Et voilà, grids that synchronize across tabs, windows, browsers, computers, whatever you need! True multiplayer data grid editing.